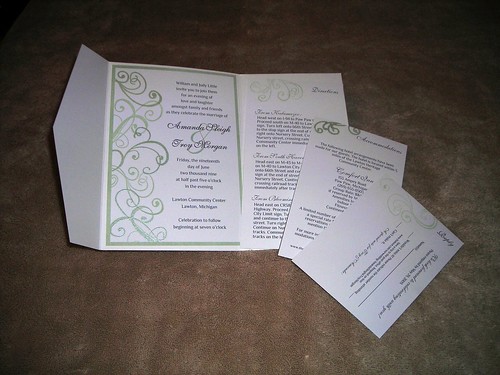
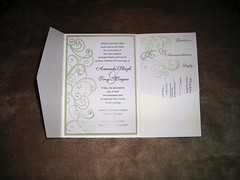
The invitations were really my labor of love during the whole wedding process. The process started shortly after we got engaged. Hours and hours and hours were sent searching the internet for invitation inspiration. And where did that get me? I found out that I had expensive tastes, but not the budget. My mother is an avid scrapbooker and having designed a few invitations for work functions myself, I felt confident that we could do them ourselves (Just to make sure though, we tested the waters with my Save the Date cards).
So, what did I want? 1) I wanted pocketfolds as I discovered early on in the search. Nothing else would compare. All the information right at the guests finger tips, held together by a cute little envelope with a pocket. PERFECT! 2) I wanted them to look professional.
What did I end up doing? Stamped and embossed pocketfold invitations with three inserts: Accommodations, Directions, RSVP.
One Sunday afternoon, my mom hosted an Invitation Making Party at her house where me, my mom, bridesmaids, and three friends spent 5 hours stamping, adding embossing powder, heating, matting, stuffing, tying, and addressing 125 invitations.
What was the result? They were PERFECT!!! Even better than I could have ever expected. (Sorry, but a couple of these pictures aren't that great. Maybe I should learn how to use my camera)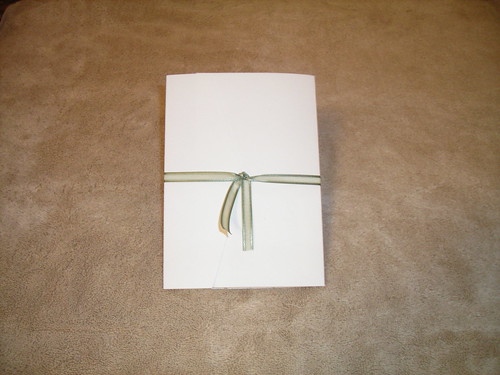

Tuesday, May 19, 2009
DIY Invitations
Tuesday, May 5, 2009
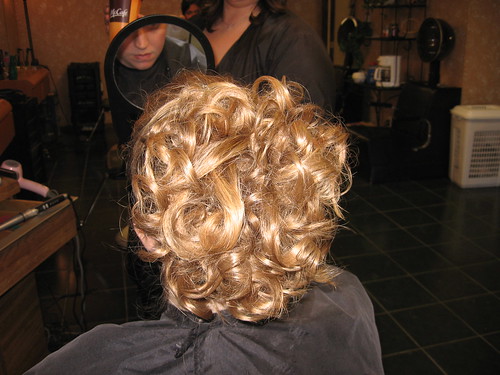
The Hair!
(I know, I know. I am not terribly creative with the titles, but it gets the point across.)
So, my last few weeks have been filled with finalizing details and trials. I schedule hair trials with two separate hair stylist, my normal stylist and a friend of my mother's. Armed with a collage of inspriation photos I headed off to each.
Inspiration photos included:


I saved all these pictures so long ago that I don't know where I got most of them. A couple came from here. I am willing to give credit if anyone can tell me who to give it to.
For as long as I can remember I knew that I wanted a head full of curls for the wedding ceremony and kept that in mind while searching for inspiration. The photo of Carrie Underwood was my favorite. But shortly after I began my search I realized that a June wedding and a head full of curls didn't sound like a good combination to me since my head sweats like crazy when I am hot. I began to envision a sweaty and uncomfortable bride.
I was determined to still have the head full of curls but wanted a second style, an updo, to wear for the reception. And it had to be simple enought that my Matron of Honor could put it up for me after the ceremony.
So me, my mom and my sister (MOH) headed off to the stylist, inspiration photos in tow, to get a trial done. In my surprise my hairstylist said that the second 'do' was no problem what-so-ever. I am so very excited about the way it turned out, I couldn't be happier. It is exactly what I was looking for.
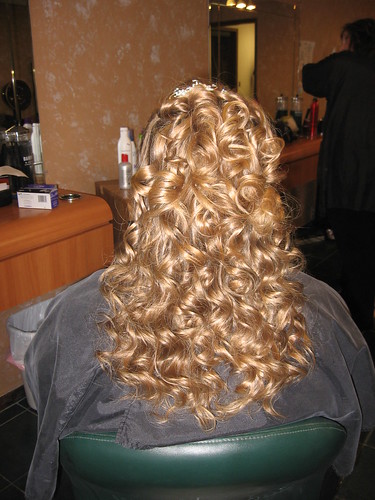
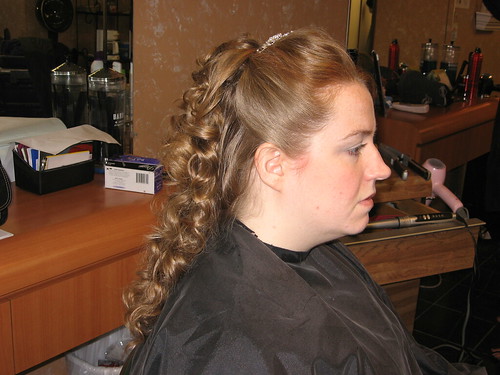

The only thing that I decided that I didn't like was the bangs off to the side. Since my hair is naturally curly the slightest bit of sweat would have made me look like I had a horn growing out the side of my head.
Stage two - up do (seriously, all it took was a twist and a bunch of bobby pins.):

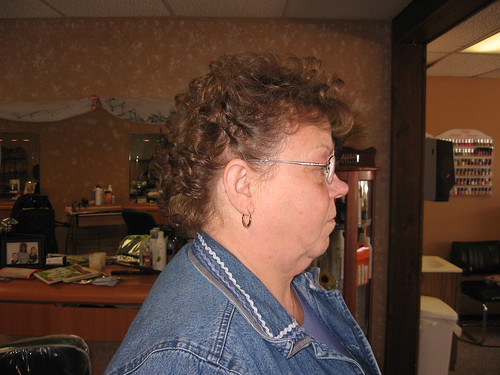
Mom got her hair done too:
Saturday, May 2, 2009
The Rings!
So Troy and I went last week to get our wedding rings. It felt like a big milestone in the wedding process. It also made me realize how close the big day really is. As my sister so happily pointed out---I am getting married next month!!!!
So, back to buying the rings. I had jewelry stores. I am the type of person that likes to go in, browse, and not be bothered by someone hovering over me trying to pressure me into buying something. I had found the ring that I wanted on-line for a really great price, but missed out on the sale and told Troy that he had to be the bad guy and barter the price down as close to the sale price as he could possibly get it.
I don't know what came over me when I walked in the store, but I took the whole ring buying/bartering job over. In the end I was really proud of myself and ended up getting us really good deals on our wedding rings.
Photos
This band perfectly accents the baguette diamonds that accent my engagement ring.
I was surprised when Troy picked out this ring. It wasn't exactly what I had pictured but I love it. It is made out of tungsten which doesn't scratch or anything. The only problem with tungsten (and titanium) is that it cannot be resized so we had to order the ring in his size and it will stay that size forever. We did find out however, that we can return the ring to the jewelry store and get the ring replaced if at any time it does not fit.
I am so excited to finally have this taken care of. Been fighting off the urge to wear it ever since.
Friday, May 1, 2009
The Cake!
I am truely blessed to have one of the most talented cake artists for an Aunt. As long as I can remember I have had dreams about Aunt Barb making my wedding cake and am so excited for that to finally happen. My problem, how do you decide what you want when you can have anything you could possibly want?
For the last year I have been searching the web for cake inspiration and believe that I have finally narrowed it down. I know a couple of things: I have decided that I want something simple, I would like 4 tiers, square, with flowers trickling down the sides. Here are a few inspiration picutres (photos from The Knot):
I love the swirls that crawl up the side of this cake and the ribbon along the bottom of each layer.
Again, love the ribbon, swirl design on every other layer and the Monogram/flowers on the top.
Love the flowers trickling down the side and the swirls. Don't particularly care for the big gold dots though.
Love the randomness of the flowers on the different layers of the cake.
Monday, April 6, 2009
Visit two to the Venue
After months of searching on-line and stalking many blogs I had developed a plan for my centerpieces and ceremony decorations. So, my mom, sister and I headed to the venue to do a trial run. We packed up candles, ceremony decoration supplies and bought a bunch of flowers from the store. The trial went so much better than I could have imagined and I fell in love with my decoration ideas.
The Centerpieces
Our florist will be designing a "Bouquet" that will be placed in a vase on the table, slightly off set. My mom described it best by calling the look 'naturally simplistic'. When talking with my florist, my ideas was a look something like walking out to the garden, picking a bunch of flowers and placing them on the table. Understanding that water would be a concern she proposed that we set a bouquet of flowers in a larger vase so that they lean to the side. I plan to set all this on a mirror surround by candles. I posted earlier about my DIY candle holders, but since then I have decided that having three different candle designs was too busy so I will have 5 votive candles with ribbons and embellishments on them.
 We decided that we need something else on the table to sprinkle around so I am going to look on the wonderfull World Wide Web for some of those plastic diamonds to place around.
Ceremony Decorations:
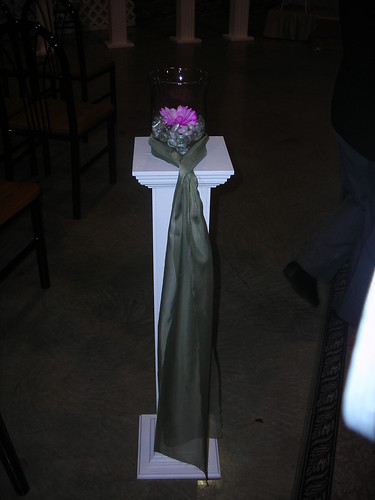
This is how the ceremony site will be set up. The overhead door behind the alter will be open to give a feel of being outside.
 The florist will be creating a customer flower arrangement for the arch which contains the same flowers that are in the centerpieces. The 8 pillars to the sides of the arch will each have a fern on them. The ferns are huge and specially grown for the Community Center (A free ceremony decoration, county me in.)
I contemplated for several weeks what to do with the pillars linning the isle. I knew two things: 1) that I wanted something simple and 2) the white was too much. I found on our trial run that the vases are glued to the top of the pillars. Here is what we decided on to dress up the pillars:
I am really excited with how the trial went. In additon to finalizing ceremony and table decorations we were able to meet with the Event Director to get answers to some lingering questions that we had. All in all it was a great experience and we walked away feeling very positive.
Bridesmaids
To begin the updates I will start with the Bridesmiads. I really wanted each bridesmaid make the look there own. When selecting their dresses I gave them some pretty loose criteria. They all had to pick the same designer, select a tea length dress of their choice (preferrably a chiffon fabric), in the color I selected from that designer.
They all ended up going for David's Bridal Dresses, in clover green-I really think that the clover green will make the bright colors in the bouquets pop.


1) Mistelle's (MOH). 2) Mandy's Dress. 3) Brandy's Dress.
Source
I love them all. Each dress fits each girls own personality and am excited that everyone has said that they will wear their dress again. They will be wearing silver shoes and jewelry from lia sophia.
Update...
So, I said that I was going to create this blog as a way to keep organized, and a way to keep important people up to date, and what has gone and happened???? I completely abandoned it. I feel horrible and really wish that I would have kept up on it. So much has been going on:
- My dress is in - fittings will begin mid-May. I posted about my dress previously.
- Girls dresses are all ordered and two of them are in.
- I held an invitation making party yesterday and got all the invites stuffed.
- I have ordered most of my accessories including veil, hair comb, and shoes.
- Gathering pieces for favors.
- Decided on centerpieces and went for a trial at the hall.
I just can't believe how much I have done already in just a few short months. Even harder to believe how much other stuff I still have to do. Since it is coming down to the nitty gritty, I am going to make sure that I keep this blog updated.
Sunday, February 1, 2009
It's my pleasure to introduce to you, SARA!
So, I will be the first to admit that I totally put off buying a wedding dress. My procrastination was due to several reasons: 1) I didn't get the feeling that the dress I had picked out was "The O,e", 2) I didn't want to have to order a size 20 wedding dress, 3) I had an unrealistic idea that it would only take a couple of months to get the dress in, and I could always rush order if I needed to. Last week, while stopping by a local shop to try on a couple of dresses, I found out that it might be impossible to get the dress I was planning buying in time for the wedding. Why did I only leave myself 4 1/2 months?
Well, on Friday my Mom and BM Mandy headed out to purchase my dress. Friday was the day, wether I liked it or not. I had picked out a dress that I really liked and was ready to order, but after finding out that I might not be able to get it, decided to try on a few gowns.
The first stop on our trip was Bridal Lane in Dorr. The store front seemed kind of small, but they had an awesome collection and the sales women were very helpful. We browsed the racks and picked out about 10 dresses to try on. Three dresses into I slipped into Sara: chiffon, beading, rouching, what more could a girl ask for?


It was perfect, but could I get it in time? I walked around in the dress for a few minutes while the sales clerk called the company to see what they had in stock. "Good news," she said. They had the dress in stock, but in a size 16. Well, that wasn't going to work, I have been trying on size 20 dresses. But, they could rush it to me by May 1st, allowing plenty of time for alterations. I was sold.
I started to order the dress and took my measuresments. I was in awe, my waist measured into an 18, but my bust and hips measures at at a 14 & 16. What should I do? A 16 was in stock, but should I risk getting a dress too small? I asked the clerk if I could try on a size 18 by the designer. They didn't have one, but they did have a size 16, in a mermaid cut of all things. If that fit, I knew mine would. And it did!
So, in the end, the procrastination paid off. I found a dress that I absolutely love and is everything I wanted. And I will have it next week. It was just meant to be.
Tuesday, January 27, 2009
Weekend DIY Project
My MOH and I got together this weekend to brainstorm some a DIY votive candle project. I got a great deal on 144 votive candle holders and candles on e-bay but thought that I might want to embelish them in some way.
We pulled out the craft box and came up with three different designs:
- The first one is an M (it is kind of hard to see because it was done in yellow paint). It is the same M as will be in our monogram.
- The middle one is just ribbon and gemstones.
- The last one is a flourish design wrapped around the entire votive holder. It is the same flourish that is on the Save the Date cards and will be on the invitations.
As I am finishing up the painting I will post pictures on how I did it for anyone that is interseted. It was a lot easier than it may look.
UPDATE: The Men's Attire
So, we went to Men's Wearhouse the other day to get an idea of what the men should wear for the wedding. This ended up being a wonderful trip. Alert the media, Troy has made a decision on what the guys will wear. And the verdict is: Troy will be buying a nice black suit and the guys will be wearing black dress slacks, white button up shirt and tie to coordinate with the bridesmaid dresses.
Also, Troy has two kids that are going to be part of the ceremony. We were fine if they wanted to wear a suit like their dad or slacks like the other guys and decided to let them make the decision. They decided suits. What cute first family portaits those will make!
Friday, January 16, 2009
The men's attire
During the entire planning process me and Troy have not seen eye to eye on the men's wardrobe. I promised Troy that he did not have to wear a tuxedo (aka Monkey Suit) if he didn't want to, after all it is his day too and I want him to be comfortable. But it has come apparent that not having to wear a tux translates into two completely different things. I thought that meant a nice suit. I am not sure what Troy thought, but suit was not it. Ultimately we decided that I have to make the final decision and if I wanted to him to wear a tux he would.
I don't like that idea. The only way he is really going to be truely comfortable is if he has to make the decision. I have chose to supply him with some inspiration. While I do love the look of all the guys in a tux/suit:
I also found these pictures on the Knot website and I'm really digging this idea. I love the idea of the groom wearing something that distinguishes him from the rest of the guys. And after the formalities of the evening are done, I have no problems with him taking his jacket off too. 
But, how would this look with the whole bridal party?
ABSOLUTELY ADORABLE!
And I think in the long run that this could be a lot cheaper for the guys. Check out this ensemble from JCPenny:


and the best part: All three pieces are only $72.00 together.
We are supposed to go looking around to some tux places this weekend, so we will see what that brings. But I am definitely printing out these pictures for him to take a look at.
Wednesday, January 14, 2009
Picking a color scheme
So, I have to admit that picking the color scheme was very difficult to me. I of course have my favorite colors, but I was affraid that picking just a few colors would limit my flower selection way too much - and flowers was what I wanted more. I LOVE flowers, all flowers, all colors and wanted to include a variety of them throughout the wedding.
My solution. I chose green as a base color to work from. Why you might ask? I envision is being the stem of a flower - then I can choose whatever flower color I wanted. I decided on a clover green color for the bridesmaid dresses, the STDs and the invitations. I also plan on incorporating this color in miscellaneous other items (whcih are yet to be determined).
So I went about this whole color thing a little different than most. I went to my florist. I worked with her to determine which flowers I wanted to have showcased throughout my wedding and what colors. I did know that I wanted bright vibrant flowers. This has determined my color pallette.
Here are some inspiration photos to give you an idea of the bright bouquets against a green dress. from The Knot
Not exactly the color green I am going for put look at the beautiful bouquet. again from The Knot
Closer, but still not the right green, but again beautiful. I love the tea length dresses, each in a style to suit the bridesmaid.
I put together my color pallette at http://www.colorcombos.com/ based on a site recommendation from Miss Lattee on weddingbee. If you haven't checked out that blog yet, you should, it is the best wedding blog ever!
I WON!
So, as I have posted before Wedding Bee is the best wedding blog ever! Every once in a while they have a contest that you can enter simply by posting a comment on the post. Well I recieved notification today that I WON!
I won 250 Save the Dates from Magnet Street Weddings. I am so excited I can hardly contain myself. I never win anything. I read about their contest and went to browse their website and fell absolutely head-over-heals in love with their Flower Flourish design. It fit in perfectly with the theme I am going for (more about that later).
I have already made STD cards, but the mini magnets will be an excellent addition to what I have already created.
Thursday, January 8, 2009
My venue
I knew for sometime before it actually happened that I was going to get engaged. Troy told me to go ahead and start planning the wedding but I refused to for several reasons 1) I was sure that if I went ahead and started planning before I got the ring, that I might not actually get the ring 2) I didn't want to do anything without my mom.
So how do you start planning a wedding keeping it low key? The venue. I spent countless hours researching area venues on the internet. I started a spreadsheet that listed the venue, website, location, phone number, e-mail, capacity, price (if it was actually listed on the website), the distance it was from my home, and any other notes. I know it seems kind of crazy but this ended up being a lifesaver.
After we became engaged we put together a quick guest list (yes it has grown some since then) to get an idea of how many people we planned on entertaining for the evening. In addition to the number of people attending there also had to be a place for a ceremony, either on-site or nearby. My list was quickly narrowed down to 5 places.
Within days of my engagement my mom, sister (MOH) and I took a road trip to view all the final choices for location. The Lawton Heritage Community Center (LHCC) was the second place on my list. I fell in love and nothing else seemed to compare.
The view from the outside does this place no justice. Here is the Hall Director's description:
"Nestled in the heart of grape country is Michiganʼs oldest Winery, renovated to become one of the areas most unique places for your wedding and reception. The Lawton Community Center is built entirely of cobblestone both inside and out, accented with a variety of wine colors and decorations. Entertain your guests between the wedding and reception with a tour of our museum, highlighting the history of wine country. Our museum offers an ideal setting to offer your guests hors dʼ oeuvres and wine tasting as the introduction to the evenings fabulous festivities."
The LHCC offers two ceremony options. First is outside in the front lawn (shown on the picture above). Troy and I were planning on having an outdoor ceremony but I wasn't too thrilled about this location. There is an Amtrack route that runs along the facility and the director said that I can almost bet on a train inturrupting my ceremony. She assured that it would only last about 15 seconds though, if I decided to go that route. The other option is the great room. A two story cobblestone room. My entrance will be from a set of french doors in the reception room that opens to the second story of the great room and down a flight of stairs. When the lady was describing the grand entrance I was almost in tears. That's when I knew this was the place.
 They recently installed a huge overhead door that you can open up to look over a wooded area. An inside ceremony that looks like it is outside, awesome. No need to worry about the weather.
 The reception and bar areas are beautiful too. Not much decoration, if any is needed. And set up, clean up and the Hall Director are all included in the rental fee. It was too perfect and I was completely sold.


I need to go back again, take some better pictures and get measurements of some things for other vendors. But I am so excited to have selected LHCC as my venue.
Friday, January 2, 2009
A way to organize
So, I am going to start writing a blog to help me keep my ideas organized and manageable. Since I became engaged I have become totally obsessed with planning my wedding. I spend hours browsing the internet looking for ideas and trying to find a cheaper way to do things. I have saved countless inspiration pictures and DIY ideas. I hope this blog will become my way of prioritizing my projects and making sure that everything is done.
I am trying to plan a wedding on a limited budget. While living Michigan is wonderful, most people here fall victim to the poor economy because of the prevalence of the auto industry, and my family is no different. While no one has lost their job or been subject to layoffs yet we are all trying to do our best to make ends meet, save up for the worst, and plan the BEST WEDDING EVER for a day I will remember forever.
The blog is becoming more necessary for me now because we are only 5 ½ months away from the wedding and it is all becoming a reality since I will be mailing out my STDs within the next two weeks. Immediately upon becoming engaged I began to look at reception venues. I fell in love with the second place I saw, the Lawton Heritage Community Center. The only problem, it was booked for every single Saturday from April to October. I love flowers and had to have a summer wedding so, in order to ensure the venue of my dreams, we booked for a Friday. (I was nervous at first, but am finding that this is more common than I though. Plus, most vendors are cheaper on Fridays so there are some cost savings.)
Knowing that my wedding was going to be on a Friday I wanted to make sure that I told people ahead of time so I decided to send out STDs. Shortly after I became engaged my MOH (sister) and I designed and made my STD. They have been sitting, done, ready to be mailed out since August. I decided to send them out about 6 months before the wedding, but didn’t want them to get lost in the holiday mail between Thanksgiving and Christmas so I set January 15th as the target mailing date.
Since then Troy & I have been working on getting our 250 person guest list finalized. This week I sat down and really plugged away and…..now it is about 4/5 complete. It feels good to have it complete so that I can get the STDs mailed. Sending out the STDs seems kind of a milestone for me and now the wedding is a reality, but now I feel the clock ticking away. So much to do, so little time.
I plan to update the blog regularly with all the little things that I have already taken care of (including how I made my STD cards) and all the little things that are still to come.

